 | To facilitate a meeting, follow these steps. |
Best Practice Tip: At the beginning of the first few virtual classroom sessions, you may want to display a Welcome Slide that shows students the basic navigation in the virtual classroom
WebEx Host Interface - Microphone: Click to mute or un-mute
- Webcam: Click to activate your webcam
- Share Content: Click to share your screen or applications open on your computer
- Recorder: Click on this to record the session
- Participants: Click to see who is in the meeting
- Chat: View and send text messages
- More options (3 dots): Click to adjust audio, camera, etc.
- Leave: Click to leave or end meeting
| 
|
Sharing Files or Apps on Your Desktop such as a Browser TIPS: Make sure to have your applications open (e.g., open your browser and go to the Website that you’d like to share) before your WebEx session so that you have it ready to share. |
- There are several ways to share a file (e.g. .ppt, .doc, .xl, .pdf, etc.) or browser in WebEx. This is one of the easier methods.
- At the bottom of the WebEx window, click on Share Content.
- Select the window that you would like to share.
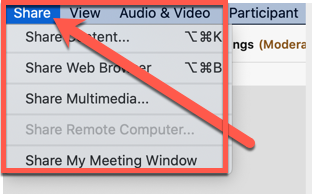
- If the Share Content option is not readily available, click on the Share tab from the menu bar at the top.
- From the drop-down menu, click Share Content…, Share Web Browser, or Share Multimedia…
|   |
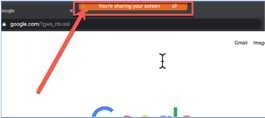
- The WebEx interface will disappear and you’ll just see your desktop. An orange “sharing” bar will appear at the top of your screen indicating the application that is being shared.
- Move your cursor over the orange “sharing” bar at the top of your screen to access the WebEx menu bar.
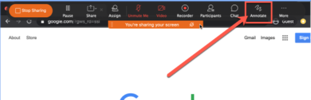
- In the WebEx menu bar,
- Click Stop Sharing to stop sharing applications and return to the WebEx interface.
- Click Share to select a different application to display to participants.
- Click Participants to access the Participant panel.
- Click Chat to access the Chat panel.
- Click Annotate to make notes on your screen for participants to see. Allow participants to also make annotations. Capture your screen to your clipboard.
| 

|
Accessing and Saving Annotations TIPS: Use the Annotate tool when sharing files or applications to collaboratively share ideas and explaining concepts.
|
- Click on Annotate from the WebEx menu bar.
- Use the annotation tools to draw directly onto your shared application.
|  |
- Allow participants to collaborate on the annotations by going to Assign > Allow to Annotate > Select Student(s).
|  |
- Click on the Capture Screen to Clipboard icon to capture your annotated screen to your clipboard and paste it into a Word Processing application.
|  |