Who can use this feature?
Users with the Creator role or greater
Available to Enterprise plans
Video Tutorial: https://drive.google.com/file/d/18wbCOHh1pGdYBCx1SdtSSnzyK3J2zE6W/view
| Overview In Panopto you have the ability to add quiz questions to any Panopto video at any point during the presentation. Quizzes can only be taken by users that are signed into your Panopto site. In this article, you will learn how to create and edit a quiz as well as how to review the results.
TABLE OF CONTENTS |
Create a quizOpen your chosen session in the Panopto editor.
Click in the timeline to navigate to the place in the video where you would like to insert a quiz. The red vertical line will indicate where the quiz will be added in the video (Fig. 1).
|
Figure 1 |
| 
Figure 2 |
- A quiz window will appear in your secondary stream window where you can fill in the details for your quiz (Fig. 3).
| 
Figure 3
|
Within the form, you can select the drop-down menu in the top right corner to show different types of quiz questions. The quiz options include True/False, Multiple Choice, Multiple Select, and Fill In the Blank. The default is multiple choice (Fig. 4).
| 
Figure 4 |
Multiple Choice: Gives you the option to have several answers present, but only one answer can be chosen as correct. When the option is first chosen, there will only be two answer fields. Another answer field can be added by clicking the "Add Answer..." button (Fig. 5). You need to have the correct answer selected before adding another question.
| 
Figure 5 |
| 
Figure 6 |
| 
Figure 7 |
Other quiz question types include True/False, which gives you the option to ask a True or False question. And Multiple Select, which gives you the option to have several answers present and more than one can be selected as correct. Note: when using multiple select, all correct answers must be selected by the viewer in order to be marked as a correct response. Once you are done with a question and want to add another one, click the Add a Question button at the bottom of the form (Fig. 8).
| 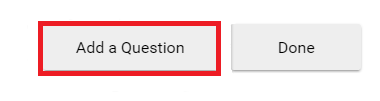
Figure 8 |
| 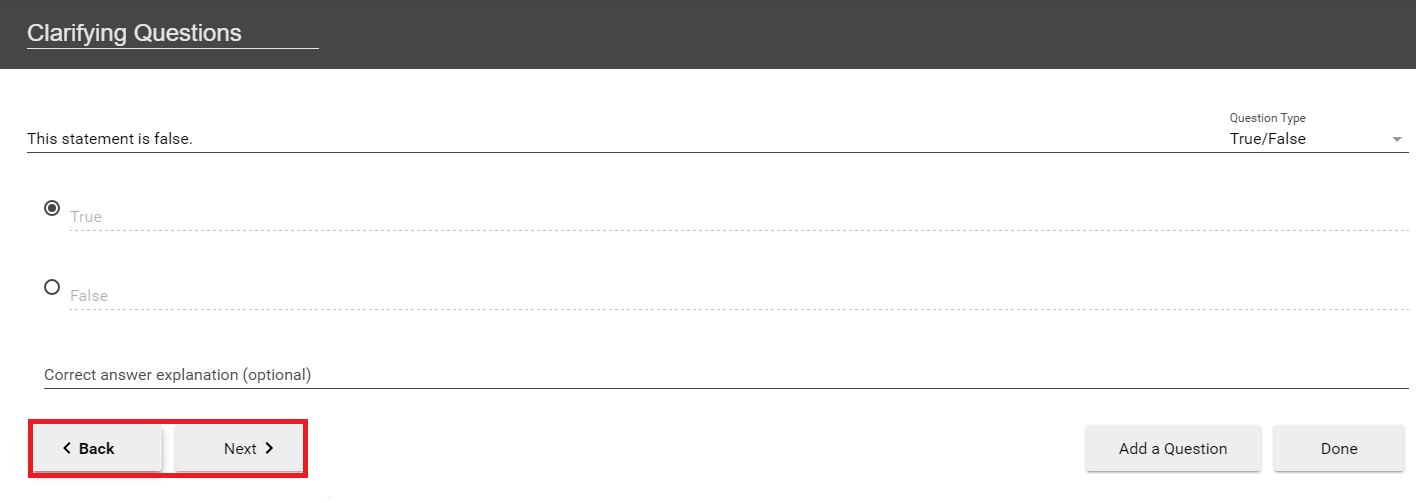
Figure 9 |
|
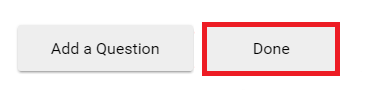
Figure 10 |
You will then be directed to the Options page for this Quiz. In this page, you can: (Fig. 11). - Allow viewers to retake the Quiz. Please note: When this is enabled, Panopto can only retain a user's most recent score.
- Show grade after taking this quiz (If this is enabled you can also allow review of correct answers and explanations)
- Allow review of correct answers and explanations
- Block advancing in the video until answering this quiz. Please note: This applies to viewers who have not yet completed the quiz. Once the quiz is completed, the viewer has the option to continue watching.
- Delete questions by clicking the X
- Reorganize the questions by using the arrows
Once you are finished, click the Finish button. The name of your quiz will now appear in the Quizzing pane. Repeat these steps for each quiz you want to add to your session. When you are finished, click Publish. During playback, when it is time for a Quiz the video will pause until the question(s) is/are answered.
| 
Figure 11 |
2. Editing a Quiz If you need to correct an item in a quiz, adjust the options you selected in step 1.13. above, or need to move the test to a different position within the video, please use the following steps. Prior to editing your quiz, please note that changing the quiz settings, such as the ability to retake the quiz or show a quiz taker their score, will not clear quiz results. Making any changes to the quiz questions, such as changing its answers, wording, or question order, will clear any previously recorded quiz results. |
Open your video in the editor. Select the Quizzes tab from the left hand navigation, then select the quiz you want to edit by clicking on it (Fig. 12).
| 
Figure 12 |
| 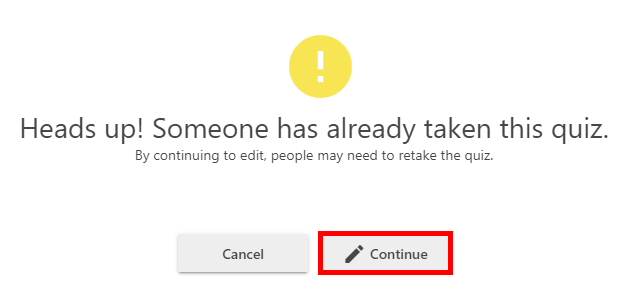
Figure 13 |
To edit the quiz name, questions, or text, simply click on the text you wish to change. The editor will open the quiz to the first question; to change which question you are on, select the Next > button in the bottom left hand corner (Fig. 14a). To add questions to your quiz, select the Add a Question button (Fig. 14b). Note: to learn about removing a question, please see step 2.5., below.
| 
Figure 14a
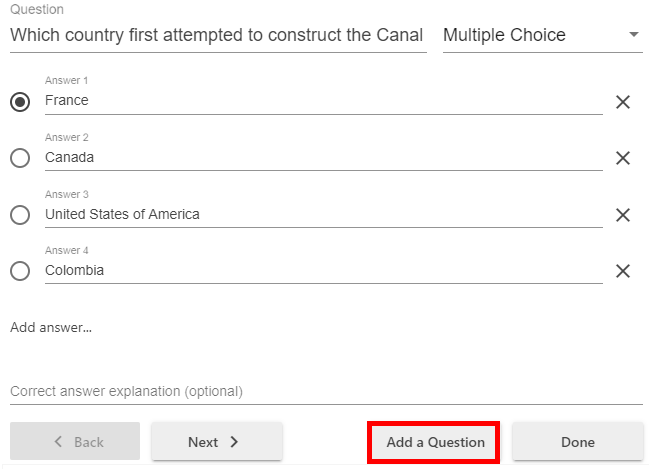
Figure 14b |
You can change the question type by selecting the drop-down menu in the upper right-hand corner of the quiz (Fig. 15). Note: If you change a multiple choice or multiple select question to a true or false question or fill in the blank, but do so on accident, your answers for the multiple choice or multiple select will be erased and you will need to type them back in.
| 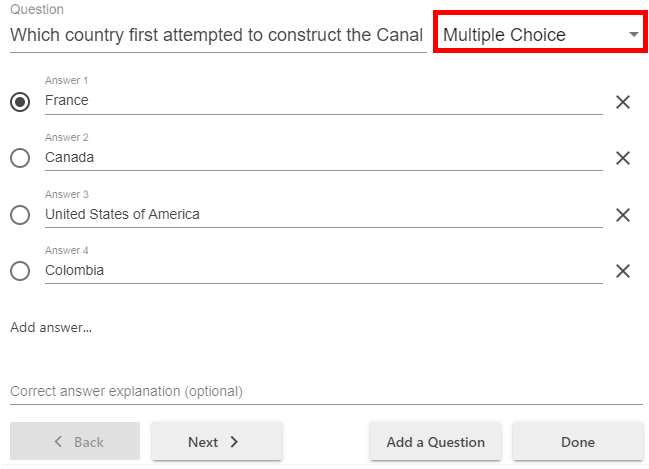
Figure 15 |
To edit your quiz options, including where its positioned in your video, or to save the changes made in step 2.3., select the Done button (Fig. 16).
|  Figure 16 Figure 16 |
This will take you to the quiz options, where you can change the settings you selected or deselected in step 1.13. above, reorder or remove a question, or adjust where the quiz appears in the video. To reorder your questions, use the up and down arrow icons to its right. (Fig. 17). Note: the questions will appear in the order in which they are asked.
| 
Figure 17 |
| 
Figure 18 |
To adjust where your quiz appears in the video, make a note of the time stamp where you want the quiz to fall, and then type it in at the top of the page next to Quiz Position (Fig. 19). Note: the time stamp is written in as h:mm:ss.ss.
| 
Figure 19 |
| 
Figure 20 |
Viewing Quizzing Results- To access the results of a quiz, hover over the video in the video library and select the Settings button that appears (Fig. 21).
| 
Figure 21 |
| 
Figure 22 |
From this tab, you can see Quiz Results Summary which shows the total number of correct answers and questions as well as the percentage correct for each quiz. You are also able to get a more detailed view of results by section. Click the Section drop-down to select which quiz section to drill into (Fig. 23).
|  Figure 23 Figure 23 |
| 
Figure 24 |
The option Download appears to the right of the User Results Summary, which provides a summary of results per user, and Detailed Results by Section, which provides details on how each question was answered by a user (Fig. 25). This will make it possible to convert the quiz results to .csv files including the username, quiz, question, response, and correctness. Note: This report includes up to 50 quizzes and their results. Any additional quizzes in a video will not be included in the report. Additionally, exporting quiz statistics will pull a user's last quiz attempt if they retake a quiz.
| 
Figure 25 |
Selecting Clear from the Clear Quiz Results section will clear all existing quiz results (Fig. 26). Please note: Clearing quiz results will make any existing results unavailable. If you will need to refer to the original results in the future, please download them prior to selecting Clear, by using the guidance provided in step 3.5, above.
| 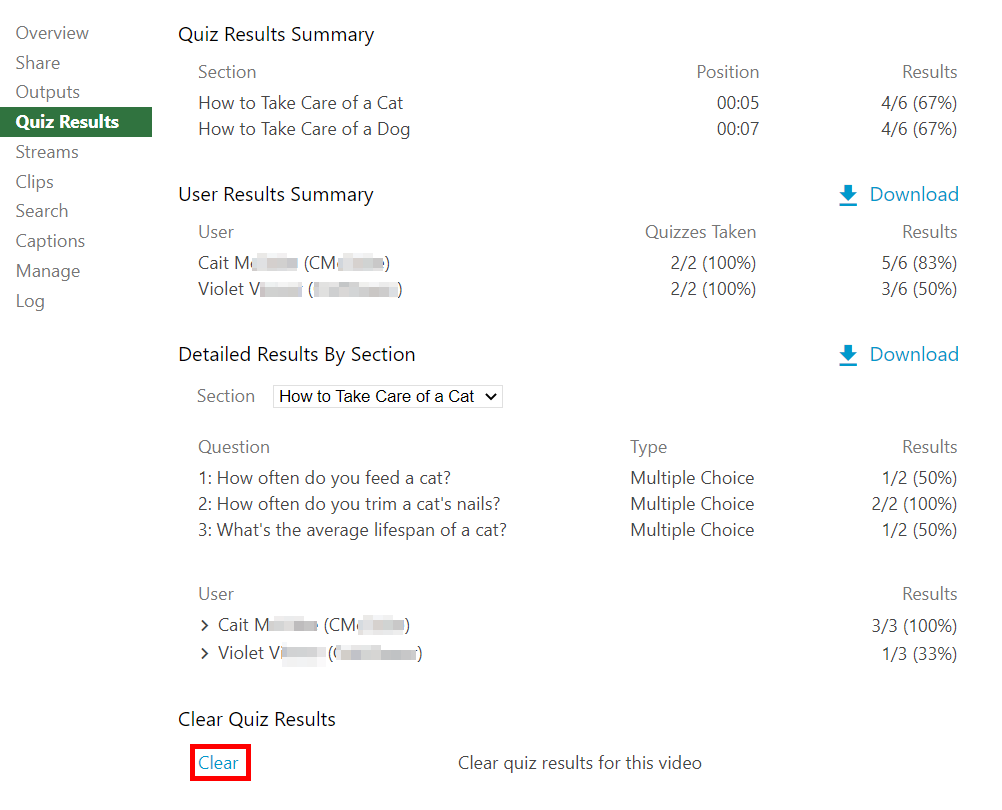
Figure 26 |
For more information on how to use Panopto with Canvas, please visit our Canvas documentation.
